Friday, March 20, 2015

Blog #5 The Perfect Iced Coffee

Are you in the mood for a delicious iced coffee but do don't feel like driving to a coffee shop to buy it? I'm going to show you how I make the perfect iced coffee!

Things you will need
A coffee maker 
Coffee grounds or course I recommend a strong dark roast 
Brown sugar and spoon
Half and half 
A mug to mix your ingredients 
A glass of ice and a straw 

Are you ready?! Let's begin 
Step 1 
Brew your coffee. If you have an option for "strong or bold" use that setting

Step 2
Once that is brewed, pour some into the mug

Step 3
Add a tablespoon of brown sugar and stir that in. The more brown sugar you use the sweeter it will be.

Step 4
Add some half and half to that. Use the color of your drink as a guide. The lighter the drink the creamier it will be. If the drink is darker, you will taste more of the coffee. I enjoy an iced coffee  that is creamy but still bold so the medium color taste best to me but you can tailor yours to make it perfect for you ! 


Step 5 
Since the creamer is cold it cools down your hot drink before hitting the ice. This helps with keeping your iced coffee from becoming watery! But the coffee will still be warm so pour it slowly into the glass. 

Step 6 
Stir with a spoon, put a straw in and enjoy your iced coffee! 


Tips: 
Taste your coffee once you add in the brown sugar to make sure it's sweetened the way you like. Once your drink is mixed and complete you can't add the sugar because it will not dissolve. 
If your drink is too hot before adding it to your ice, the ice will melt and you'll have a watered down iced coffee. 
To make more for later: 
Once you brewed your coffee add in the brown sugar. You can do right in the coffee pot! Once the coffee has cooled down pour it into a reusable container or bottle. When you are ready for another iced coffee pour some over ice then add your half and half to your glass stir it and enjoy.
Thank you for checking this out! I hope you enjoy your delicious iced coffee! If you tried this recipe let me know how you liked it! πŸ˜ŠπŸ‘ 
*like *comment *share 

Monday, March 16, 2015

DIY project entry #4

Dress makeover!
I'm going to show you how I turned this dress into a trendy skirt! 


Things you will need 
A dress 
scissors
Measuring tape and safety pin
Elastic 
An iron and spray bottle 
Sewing machine or needle and thread 

Step 1 
Try your dress on and decide how long you want your skirt to be.
Step 2 
Cut the top of your dress according to the length you've chosen. Cutting the top will leave you with your soon to be skirt.

Step 3
Spray your skirt with water and iron it.
Step 4 
Hem the waist line! Make an inch fold and spray/iron to create a crease. Use pins to hold the fold.


Step 5 
Sew that, but remember to leave enough width for the elastic. DO NOT sew it closed you will need to leave a hole to insert the elastic. 
Step 6 
Measure your waist and cut the elastic to fit. Attach the safety pin to the end of the elastic. Use the safety pin to help guide the elastic thought the fold of your skirt

Step 7 
Once you have made the elastic all the way through the waist band sew the elastic together then close up the hole. 
Step 8 
Stretch the elastic and move your skirt around to get it to lay the way you want!

Your new skirt is done and ready to complete your outfit πŸ˜‰
Bloopers: My dress originally had pockets but I had to cut them out because they made my skirt puffy! 
My safety pin kept breaking use a sturdy one! 

I love my new skirt and I got tons of compliments but it was my first time making a skirt this way! Now that I know what to expect I'll do better next time! 
 
Thank you for checking this out let me know what you think! πŸ˜˜πŸ‘


Thursday, March 12, 2015

Blog entry #3 MAKEUP!

Tonight is date night for me ❤️ I don't always do my makeup but I do for date night! Here's my look for date night if you want to see how I did my makeup 
continue to read my blog 😊

Things I used for this look
Let's begin...
I have some scars on my face and also a huge birthmark and since the makeup I'm using is all light coverage I used a NYX eye primer on the spots that need that extra help.
After I blended that in with a foundation brush... 
I gently applied a few dots of my regular Rimmel foundation all over my face 
With a darker shade of make up I used a small concealer brush to contour my nose my cheeks and my forehead 
After I blended that I applied the Maybelline concealer to my nose under my eyes and in my T area 
I added some blush to my cheeks I used NYX in color pinched 
Next is Rimmel eyeliner 
I applied some kohl eyeliner! My technique is to do short strokes starting from the outside of the eye working my way in and then I dotted some on my crease. 
BLEND THAT IN! 😱
I Added some brown eyeshadow only in the crease and whatever was left on the brush I swiped it to my lower lash line 
MASCARA 
I used black mascara on the top/bottom lashes 
Tip trick put some kohl eyeliner on the rubber part of your curler to add an eyeliner effect to your eye 
Next lips 
Using only lip liner I outlined my lips and then I colored them in! I used my finger to smooth and blend in the color. 
DONE 
I'm ready for my date night with my honey 

I hope you enjoyed this blog entry 
*like *comment *share 😘 
Ps no filters were used in these photos so you could see the real color of the makeup I used! πŸ‘


DIY project #2

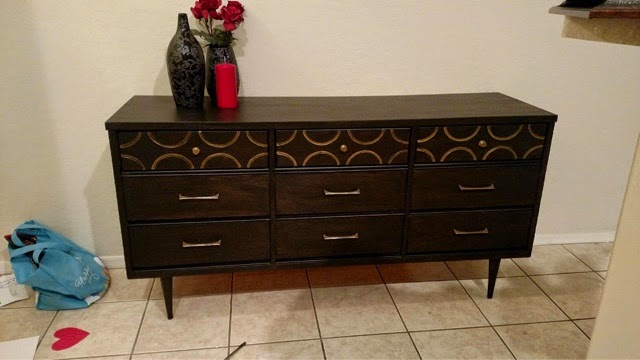
Today I am going to share a project I did with a dresser. I'm going to show you how to give your old dresser a modern make over. 

Things you will need 
1.A dresser! check out yard sales or thrift shops to find a dresser you think could use a good makeover. Plus it's much cheaper to find a piece of furniture for a project at a yard sale or thirst shop! 
2.Paint! I bought my can of paint at Walmart for under $10 I used onyx black in satin 
3.Paint brush or rolling brush (depending on what effect you want your dresser to have the technique will matter!) rolling it will give it a smooth glass finish and brushing will give it the stroke look and texture
4.Sander or sanding block 
5. A rag to clean
6.Acrylic paint or craft paint must be permanent! 
Okay are you ready to begin!?
Step 1 take your dresser apart all the knobs and handles need to be removed also remove the drawers.

Step 2 
SANDING! This step makes a big mess so do this outside! Sand all the sides that are going to be painted. Don't go too crazy we aren't turning your dresser into a toothpick! Just get the shiny coat off so the new paint will stick better. 

Step 3
Wipe your furniture with a clean rag get off all the debris from sanding if you skip this step you will have a hard time painting!
Step 4
PAINT! using your roller or your brush apply the paint use a light coat let it dry if it needs another WAIT for it to Dry before you add another coat! The thinner the coat the quicker it will dry! 

Step 5
Once everything is dry move it back into the house and reassmble your dresser add the finishing touches with your craft paint 

Step 6
add your knobs and handles 
DONE! Congratulations you have a new piece of furniture that matches your unique style!  I used mine as a buffet table and I store my nice China and wine glasses in the drawers! I hope you enjoyed this project please like comment & share 😘

Wednesday, March 11, 2015

DIY project #1

Today I am going to show you how to make cute napkin holders for your table!!


Things you will need
1. A paper towel roll (just the cardboard part)
2.burlap or fabric of your choice
3.hot glue gun!
4.optional lace or flowers to spice up your holders
5.of course some cloth napkins!!

Step 1.
Cut the paper roll into 2inch pieces

Step 2.
Cut the burlap give it some extra room because it needs to fold over the paper roll
Step 3. 
Hot glue it on there and also hot glue the inside of the roll so you can fold the burlap in. 
Step 4. 
Cut off any extra burlap and loose strings 
Step 5. 
Add any decorations I hot glued a bead from an old bracelet 
And you are DONE 
Congratulations you have made an easy decorative piece for your table!! 

WELCOME

welcome to my blog!!
My name is Eve, I am a new mommy with a little extra time on my hands. A friend suggested I start a blog for my crafty DIYs! So why not?!
I enjoy making home dΓ©cor and fixing up worn out furniture. I love DIY projects!! I also love to cook and work out. This blog will soon be filled with a little of everything!


Thanks for your time
xoxo
Eve